Why I make my own prints

A good photo hasn’t fulfilled its destiny until it has been well printed. This is why I’ve always made sure that my clients get prints, at least of the best and most important photos. It’s why I want prints for myself.

In the past, I ordered prints for clients through my lab. I still do. But, for the last couple of years, since the release of affordable high-end desktop photo printers from Canon — like the PIXMA Pro-1, or the Pro-100 and Pro 9000 MkII — it has become possible for me to do more and more of this work myself, and to do that work really well. I want to say a little here about the ways this has changed my approach to taking photographs and why I find this change exciting. Printing isn’t everybody’s cup of tea, so I’m keeping this as personal as possible.


NOTE: I mention Canon only because that’s what I know. I gather from printers I know and respect that Epson makes terrific high-end printers, fully competitive with those from Canon. I just have never owned a really good Epson printer. This Epson vs Canon issue, however, is completely beside the point of what follows.


Excellence and affordability

I can get excellent prints from any of the pro labs I’ve used: BWC or Pounds in Dallas, Mpix or Bay Photo, and others. If the digital files are properly prepared for them, the prints these labs make are superior to anything I’ve ever gotten from a drugstore or from a normal consumer-oriented ink jet printer. But the work these labs do is also affordable. In fact, they are usually cheaper to me than making the prints myself on my own printers. High-quality ink and high-quality paper are expensive, and as an individual printmaker I don’t enjoy the economies of scale that a large pro lab enjoys. I don’t buy ink by the gallon and paper by the truckload.

Of course, the prints I make myself on my best printers are also excellent in the basic technical sense. In terms of qualities like color, tonality, detail and longevity, the best prints I make now are at least as good as those I get from the lab. If they weren’t, I wouldn’t bother. And while the cost of the raw materials I use making to make a print on my own is higher than the cost of a print from the lab, the costs are no longer prohibitive. Do-it-yourself high-quality printing is expensive, but affordable.

But excellence and affordability are basically negatives. They just mean there’s no reason for me not to do it. What are the positive things about printing for myself that make it worth the trouble?

Immediacy and control

With respect to printing, “immediacy” and “control” mean something very like what they mean with respect to taking the photo in the first place on a digital camera. It’s not that I get the final outstanding result immediately. It’s that I can identify failures or mistakes or weaknesses immediately and immediately make adjustments and improvements.

On occasion, I’ve gotten prints back from the lab that had problems: color might not be right, or I see that the crop isn’t perfect, or on second thought I don’t like the tonality of the image. I could make adjustments and send the file back to the lab, then wait 3 days to find out if the changes did the trick. But generally I don’t. Generally, I work hard to get things as close to perfect before sending images to the lab. And then I live with what the lab sends me.

It’s really very like the difference between eating at a restaurant and cooking for yourself. If I go to a great restaurant, I can get a great meal. But generally speaking, I eat (and pay for) whatever they bring to the table, whether it’s exactly what I was expecting or not. Cooking for myself, on the other hand, takes time and effort. But I’m cooking a dish I’m good at, I can count on my wife or daughter saying out loud that it’s better than we’d get at a restaurant.

So it is with making my own prints. Now that I have reached at least basic competence with most of the various challenges that printing presents — not just color management, but image preparation, paper choice and handling and more — I don’t have to live with what somebody else gives me. If I’m not completely happy with the result, I can tweak it and print it again.

And that brings me at last to the things that really explain why I do this. I do it because I personally find it very satisfying — and because I am convinced that making my own prints has been making me a better photographer.

Satisfaction — and purpose

The analogy between cooking and printing isn’t perfect. I like to cook and so long as I keep things simple, I’m a decent cook. But mainly, I like to eat. If I were a gazillionaire, I’d hire a chef to cook for me or I’d eat out every night at excellent restaurants. For me, eating the meal is not just the final goal, it’s the entire goal. It’s nice to get compliments when I’ve cooked a good meal, but I don’t need them. If I enjoy the meal myself, that’s enough. And while I do remember a handful of particularly successful outings in the kitchen, by and large, the pleasure of a meal is emphemeral.

Making a printed image is very different.

For one thing, the printed image endures. As I write this, I can look up and turn my glance in any direction and see prints of my photos on every wall. These prints will outlive me.

And every print gives me a satisfaction that is very hard to describe. It’s the satisfaction of having taken an image from concept to capture to development to embodiment in a print — from idea to something tangible, unique and valuable. There is pleasure in setting up the shot, getting the model (whether the model has two feet or four) posed and lighted correctly, waiting for the right expression and so on. There’s pleasure in clicking the shutter and knowing — without having to chimp — that the shot was nailed and will be good. There’s pleasure in reviewing the photo on the computer and developing it, converting the raw file and making the adjustments that are beyond the camera’s ability. And there’s great pleasure in watching for a minute or two as the print comes out of the printer, one row of pixels at a time.

The “virtuous cycle”

And in the end, all these satisfactions turn back on themselves in a kind of feedback loop or “virtuous cycle”. I mean by that mainly that seeing prints of my photos has made me a better photographer. Printing photos is a real test of quality — the ultimate test of quality, I think. That’s why I think that, whether you print your photos or order prints from a good lab, every serious photographer should make prints. At the start of this post I wrote:

A good photo hasn’t fulfilled its destiny until it has been well printed. 

The modifiers (“good photo”, “well printed”) are important here. The initial question is always: Is the photo worth the paper I’m thinking of printing it on? It’s depressing and, well, discouraging, at first, to discover that quite often the answer is simply no. Here’s a decent pic I took a couple of weeks ago of some flowers I gave my wife. But I’m not going to print it. The flowers were more important than the photo, and the flowers have already wilted. Here’s a cute photo I took with my phone of my dog Arthur at the vet. I sent it to my oldest daughter, who loves Arthur almost as much as I do, to let her know he was under the weather. It’s not a bad snap, but I’m not going to print it.

But sometimes, I ask “Is the photo worth printing?” and the answer is yes, or at least maybe. 

So I print it. My guess is, that’s perhaps 1% of the photos I take — certainly less than 5%. Many of that 1% get printed and then thrown away; some get filed in a drawer or folder; others get placed in a photo album. And those final, lucky few? The 1% of the 1%? I pick them up with my white-gloved hands from the printer tray and think to myself, Eureka! This one is worth spending $20 (or $200) to frame. This one is worth giving a place permanently on the walls of my home or office.

That’s a happy day.

But whether the photo ends up in the trash, in a folder, or in a frame, the process of printing and review generates the feedback loop aspect of printing my own photos. I didn’t always do this in the past, but now, I shoot with prints in mind. Not sometimes, but always. And that makes me work more carefully. You can’t work in careless point-and-shoot mode some of the time and turn on the quality at others. At least, I can’t.

And having shot for the print, I want to see the print as fast as possible. Making the prints myself speeds up that feedback loop. I find out more quickly what I’ve done wrong and what I’ve done right. And in turn, my growth as a photographer feeds my growth as a printer.

The upshot of all this may strike you as odd: I’m satisfied with fewer and fewer of the photos I take. But that’s been prompting me to take fewer and fewer photos and try to increase the number of “keepers”. And when I do take a good one, well, then it all seems worth while.

Q.E.D.
Review: Canon PIXMA Pro-1 printer

Here’s a link to my review of the Canon PIXMA Pro-1 printer over at Macworld.

http://www.macworld.com/article/2142570/canon-pixma-pro-10-review-professional-quality-photo-prints-right-on-your-desk.html

If you’re interested in printers, I invite you to read the review. Executive summary: I like the printer a lot.

Print of photo of Mission San Luis Rey in Oceanside, California, made with Canon PIXMA Pro-1 and printed on Canon’s Fine Art “Museum Etching” paper (supplied by Hahnemühle). This thick, textured paper is expensive and must be fed into the printer through a special slot, but the result is worth it. The muted colors of this mission church north of San Diego are perfect for pigment inks; and this Pro-10 print almost looks like a watercolor. The image can be seen on Flickr here.

How to make the best black and white camera?

I want to stipulate two things up front.

First, I love black and white. No, it’s more than that. I love black and white and — to be brutally honest — I feel very uncomfortable with color.

And second, I’m an not now, nor have I ever been, an engineer.

With that out of the way, I want to think a bit about the best way to get black and white images from a digital camera.

Colonnade at Balboa Park, San Diego. Not a lot lost in this black and white conversion, as the original scene wasn’t very colorful. In any case, what I was most interested in was the composition and the tonalities.

The idea of a black and white digital camera seems to come up fairly regularly. I remember reading a thread years ago on a Pentax forum from a photographer who thought that Pentax ought to come out with a black and white digital camera. More recently, somebody has suggested that Olympus do the same thing. Mike Johnston, a.k.a. The Online Photographer, reports this proposal, which was made on his blog’s comment board.

As much as I love black and white images, in the past, I have always thought that this idea was crazy. It just seemed crazy to me to throw away the color info. When I do a black and white conversion, I often find myself wanting to change the tonality of a blue sky or a pair of blue jeans, or darken a red bloom on a flower, or lighten green grass. Since my raw files contain info about color, I can do these things.

But Ctein, technical editor for The Online Photographer, points out something important that I never thought of:

An anti-aliased Bayer array camera discards about three quarters of the light hitting each pixel and has about 60% of the resolution of a dedicated monochrome camera. In other words, the quality of detail you’d get out of a 12-megapixel monochrome camera is comparable to what you’d see in a 30-megapixel color camera. Plus, the bigger, more efficient pixels make a real difference in how clean the tonality is and how well-rendered subtle gradations are.

That’s pretty interesting.

And yet, I’d still hate to lose that color info. Back in olden days, when we shot black and white film either because we liked it or (my primary reason) because it was cheaper than color, we’d use color filters to skew the tonalities one way or another, when we wanted to. You could still do that, with a digital camera, of course, and perhaps that’s the answer to my objection. But I’m pretty used to being able to look at the default rendering of my raw images to see what color something really is, and at the moment anyway I feel like I don’t want to lose that ability.

A better answer, I suspect, is provided by the Foveon sensor used in Sigma cameras. As it happens, Mike Johnston has commented on that, too, recently (“The Sigma DP2 Merrill and B&W“). With the Foveon sensor, every sensel captures red, green and blue. With normal non-Foveon sensors like the ones in all the cameras I have used, each individual sensel captures only one color, and a “filter” (usually with a Bayer pattern) manages to make remarkably good sense of what is really only a sample of the colors that reach the sensor. Seems to me that the Foveon sensor should be God’s gift to black and white photography.

Really wish I had about $8000 lying around, so I could buy the Leica full-frame, black and white camera. Some folks dream about fancy cars or sailboats; this is what I dream about it. Probably not going to happen. But perhaps in the next year I may be able to afford a Sigma DP2 Merrill, so I can give the Foveon sensor a try.

Tourists on the beach ogling at a napping mother seal and her pup, La Jolla (San Diego). There was color in this scene, in the water, and particularly in the clothing of the tourists, but that color was distracting. To me, this shot was about the shadows.

Reichmann on where things are now

Terrific piece by Luminous Landscape’s Michael Reichmann, talking about where the innovation is in the camera industry right now, which new ideas are good and which new ideas are not so good.

Nobody Knows Anything (Michael Reichmann at Luminous Landscape)

This article lines up almost perfectly with the way I have been seeing things go for the last several years. And the way I’ve been watching things develop explains why I didn’t go with Canon or Nikon when I left film for digital, why after a couple of years I abandoned Pentax for Sony, and why I’m now shooting with an Olympus OM-D E-M1.

My early years with digital cameras

A long, long time ago, back in high school and college, I mostly used Rolleiflex twin-lens reflex cameras. My first SLR (a gift from my immigrant grandfather) was an outstanding Exakta made in Germany. Later, I owned SLRs made by Ricoh and then Nikon.
But I’m not here to talk about any of those cameras. This is a quick review of my first ten years with digital cameras, from 1998 to about 2008.

1998: Kodak

The first digital camera I can remember using was a little Kodak point-and-shoot. Here’s a picture I took in November 1998, hiking the Grand Canyon with my wife and some friends.

I probably took it on that trip because it was light and I didn’t want to risk damaging my film SLR. I don’t remember for sure, but I think that little camera cost several hundred dollars. It didn’t encourage me to expect much from digital in the future.

2001: Olympus C3000

In April 2001, my wife and I traveled to China to adopt our third daughter, Catherine. Although I had given up on the little Kodak camera, I’d been paying attention to developments in digital imaging, and when Joan and I decided around Christmas 2000 that we needed a better camera for our forthcoming trip, I had changed my mind and felt that digital cameras were just about ready to replace film. My wife, who is more skeptical about technology than I am, was unpersuaded, so we ended up buying two cameras: a new Nikon N65 film SLR for her, and an Olympus Camedia C3000 (3MP) for me. We paid over $600 for each of the cameras. 
She took some nice photos with the N65. But the photos I took with the C3000 turned out pretty well, too, or at least I was pretty impressed with them at the time. This photo, taken in Lanzhou (north central China), was published some years later in a university journal, in connection with an article on personal milk production in China.
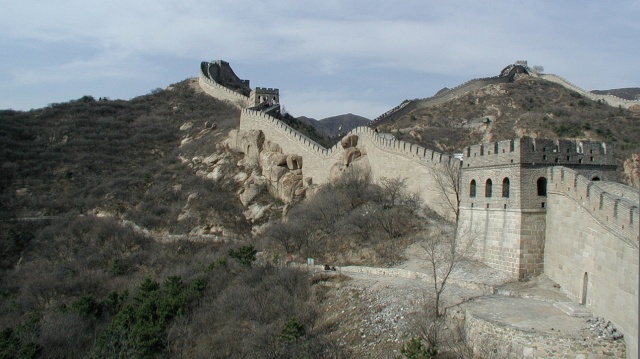
Here’s the compulsory image of the Great Wall at Badaling (north of Beijing).
Great Wall of China at Badaling, April 2001. Taken with Olympus C3000; slightly reprocessed in 2014 with PhotoNinja.
I cringe a little looking the pictures from that trip now. The memories are wonderful, of course. And at the time I thought the photos were great. It was that trip and that Olympus C3000Z camera that got me excited about photography again, after I’d away from it for about 20 years. But looking back at the images now, I have to admit that they’re technically mediocre at best. My iPhone 5 takes much better photos. And apart from the cameras, I’m a much better photographer now than I was in 2001. 
It no longer seems to work, but I still have that C3000 and we still have the Nikon N65, too. What can I say. I’m sentimental. 

2005: Canon PowerShot S1IS

I kept shooting with the C3000 for another couple of years. Around 2005, I decided I needed a camera with more powerful telephoto reach, and I got the 3.2 megapixel Canon PowerShot S1IS. The S1IS was released in early 2004, when the megapixel race was just getting started. It was actually less expensive than the Olympus C3000 had been. 
This pic was taken with the Canon S1IS on a ranch in Bandera, Texas.
Bandera, Texas, September 2005. Taken with Canon PowerShot S1IS and lightly processed in PhotoNinja.
The S1IS had several advantages over the C3000. The lens on the S1IS may have been a little better, and the camera was certainly more versatile. The S1IS could take movies. The S1IS had a better in-camera image processor than the C3000. And it had IBIS or “in-body image stabilization.” This helped particularly with photos taken at telephoto focal lengths.
Here is a little bit of video taken with the S1IS in December 2005 at Holla Bend National Wildlife Refuge, in northwest Arkansas (near Russellville). Now I love to watch movies, in fact, and I’ve learned a lot about photography from the great cinematographers. But I’ve never cared much for making movies myself and I seldom use the video feature on my cameras and I admit that this bit of video isn’t much to look at. But one thing I learned from this experience is the value of sound. We were standing in a field as thousands and thousands of snow geese hovered ahead, then landed near us. The sound was deafening.
Snow geese coming down for night at Holla Bend National Wildlife Refuge in Arkansas. Taken with Canon S1IS.

At a wedding in 2013, for the first time, I shot some video of the ceremony, not to capture the look of the ceremony, but in order to record what was said.

The versatility of the S1IS helped me start thinking about what I liked to photograph most. When I first got the S1IS, I thought it was birds. I loved shooting with the telephoto zoom, at focal lengths greater than 300mm (in full-frame terms). But eventually I discovered again what I’d known decades earlier, that what I really like to photograph is people.

2008: On to a DSLR with the Pentax K10

In 2008, I decided that it was time to “graduate” to a proper digital SLR.

Olympus had something to do with pushing me over the edge here. I was taking personal photos at the Dallas Arboretum when a fellow asked me if I’d take a photo of him and his girlfriend. He had an Olympus dSLR, the four-thirds E-520. After composing and shooting for years with the S1IS’s rear display, which was low-res digital, the experience of looking through the Olympus dSLR’s excellent optical viewfinder was nothing short of a revelation. I remember saying to myself, Wow! Immediately I sensed what I’d been missing from my film SLR days. In addition, shooting with my eye to the viewfinder seemed so much more direct than shooting with the camera held at arm’s length. It truly was a conversion experience.

But although I was about to reject the S1IS, Canon also had a major influence on my choice of dSLR. The image stabilization in the S1IS had persuaded me that in-body image stabilization was a must-have feature. I never considered either Canon and Nikon dSLR bodies because they did not (and still do not) have image stabilization. I didn’t look seriously at Olympus, either, although I don’t remember why not.

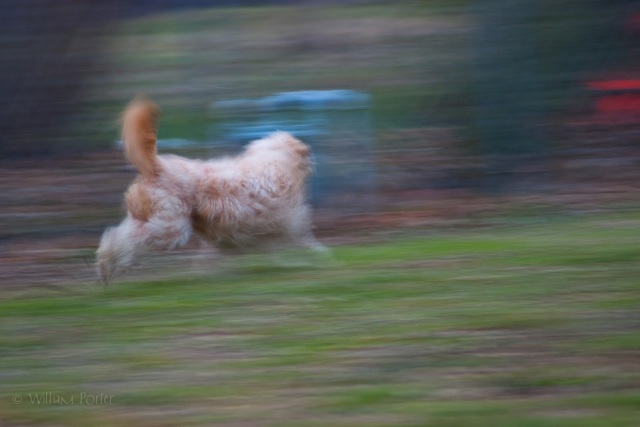
Instead, I went with Pentax, buying a K100D. I knew of Pentax’s great contributions to history of SLR photography. The fact that the Pentax K100D was one of the most affordable cameras on the market at the time was also a factor. I didn’t take many photos with the K100D but one of them happens to be one of my personal favorites out of all the photos I’ve taken.

Abby Running, taken February 2, 2007, with Pentax K10D.

The K100D was soon replaced by the K10D, which at that time was Pentax’s top-of-the-line pro camera. I used the K10D for the next couple of years, to take vacation pictures:

Catherine in the snow (Mt Nebo, Arkansas, December 2007). Pentax K10D.
Landscapes like this shot taken in Rocky Mountain National Park:

I took thousands and thousands of mostly very bad photos of school sports like basketball and volleyball:

And swimming:

I like this photo — although to get this view of the bored swimmers waiting their turns, I had to shoot over a most unattractive, overflowing trash can.
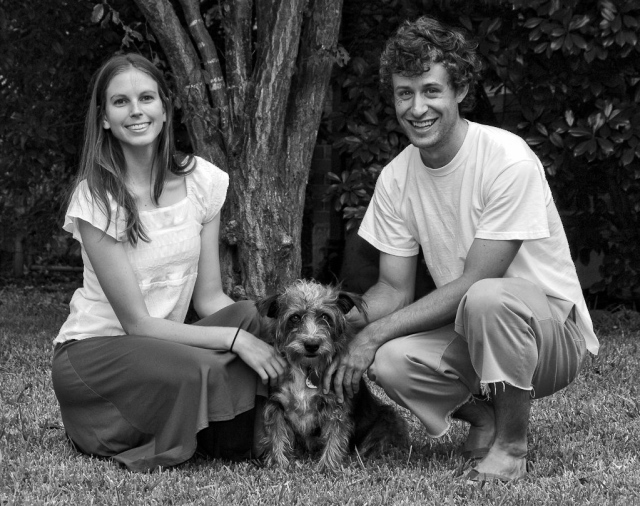
I started shooting portraits for the Dallas Arboretum with the K10D, and used it for other family portraits in the White Rock Lake area:

And the K10D helped me through my first several weddings:

Great photographer Edward Steichen said that “No photographer is as good as even the simplest camera.” I became a better photographer using the K10D and I’ve continued to get better as I’ve moved on to better and better cameras. But I have to confess that Steichen was right: I never came close to being as good as the K10D.

2008: After the K10D

That Pentax K10D was eventually succeeded by a Pentax K20D. Both were excellent bodies. Fashion photographer Benjamin Kanarek had left Canon for Pentax (for a while) because of the K20D. Pentax was also an excellent choice because the Pentax lenses were outstanding. Unlike Canon and Nikon, Pentax didn’t really make a clear distinction between its consumer dSLR systems (mediocre but cheap) and its pro line (high quality but very pricey). Instead, Pentax had only a couple models for sale and basically one lens line, in which practically everything was very good.

Of course, eventually I moved from Pentax to Sony APS-C and then to Sony full-frame (A99), and most recently, I moved again from Sony full-frame to Olympus micro four thirds. But that’s another story for another blog article.

Wireless control of Olympus OM-D E-M1 with OI.Share app

The Olympus Image Share or “OI.Share” app for smartphones allows you to do some very neat things with the Olympus OM-D E-M1 camera, like control focus, shutter and other settings, download photos to your phone, and geo-tag your photos. The only problem with this partnership between camera and phone — at least for me as a micro-four-thirds and Olympus novice — was getting it to work.

The documentation provided in the app and in the user manual for the camera is typically bad. I wrote this blog article from the notes I started making as I was trying to sort this out for myself. I hope I save somebody else an hour and some worry.

Ingredients

To get started you’ll need to have an EM-1 and a smart phone with the OI.Share app installed. I’m using an iPhone 5 running iOS 7 and version 2.1.1 of the OI.Share app. I downloaded the app from the App Store.

Addendum 7 January 2015: This article was first published a little over a year ago, in December 2013. I just went through the process again with the article in front of me. Using iOS 8 on my iPhone, what I see now doesn’t exactly match what I describe below, but the differences are minor (mainly, I’m seeing more confirmation screens).

“Easy” Setup, chapter 1

Okay, it’s not really very easy. The good news is, you don’t have to do this more than once.
Start on the camera. On the back of the EM-1, in the upper left corner of the rear display, you’ll see the word “Wi-Fi”. If, like me, you’ve never used a camera that has a touch screen, it might not be obvious that this is a button. Just tap it once.

You’ll briefly see a screen that says “Wi-Fi Starting,” and then you’ll see a screen titled “Private Connection.” On the left it will say “Connecting to your smartphone” and some other stuff. On the right, you’ll see one of those QR code things that are now so popular with the kids. 

“Easy” Setup, chapter 2

Now, you switch to the OI.Share app on your phone. 
  1. At the bottom of the main screen for the app, you’ll see a tab with an icon of a camera and the wi-fi icon. At this point you’ll also see the word “Off”. Click that tab, then click the Easy Setup button.
  2. Click the Scan button.
  3. Move the phone so that its camera lens can see the QR code on the back of the camera. Adjust the positioning of the camera and phone so that the code comes close to filling the box shown on the phone and hold everything still. You don’t have to click anything here; when the code comes into focus, it will be read by the app automatically.
  4. Next, you’ll see a setup info screen showing you the SSID of the camera and your pairing password, along with buttons labeled Try Again and Install. Click Install.
  5. Now the iOS takes over. You’ll see a confirmation screen (originating inside the iOS Settings) asking you to confirm that you want to install this “profile.” Click Install on this screen.
  6. You’ll now get another confirmation dialog, warning you that this is going to change settings on your iPhone. Click Install Now.
  7. If you have an access passcode defined for your phone (and you should!), you’ll need to enter it now. 
  8. You’ll now see a Profile Installed screen. Click Done at the top right.
You’ll now land back in the OI.Share app and you’ll probably see an alert saying “Unable to find the Olympus camera.” Don’t panic. This is kind of a stupid response for the app to give you at this point, but it’s normal. All you did in steps 1–8 above was install the camera’s profile on your phone. Now you need to access the profile.

Taking control of the camera from the phone

At this point, I gather from my reading that things may be different for Android users. I don’t have an Android phone handy to try this on, so I’m just going to describe what you do on an iPhone.
  1. Click the iPhone home button to go to the home screen.
  2. Click on the Settings icon.
  3. Select Wi-Fi in the Settings list.
  4. Turn Wi-Fi on, if it’s not turned on already.
  5. If you’re doing this within range of a wi-fi network that you’ve used before (like your home network), that will probably be the active network. But you should see your camera’s profile listed where it says “Choose a Network…” The profile is a long, ugly string of letters and numbers that begins “E-M1..”Click on the profile and wait a second or two while the phone connects to your camera.
At this point, I want to point out two things.
First, the wi-fi network that connects the phone to the camera is a local “micro network” and doesn’t get you to the Internet; it just gets you to the camera. So, when you choose the camera as your network, you lose access to the wi-fi network you had been connected to — say, your home network, or the network at the coffee shop — and that means you lose wi-fi access to the ‘Net. You cannot eat your cake and have it, too. With a smart phone you can still access the Internet using your cellular connection. Let me add that, of course, wi-fi doesn’t have anything to do with making phone calls. Even while you’re using your phone to control the camera, you can switch and use the phone to make or take a call.
Second, look at the back of the camera. It still says “Connecting…” But something has changed. Above the word “Connecting,” you’ll see a green wi-fi icon. This wasn’t the case earlier but there is now a numeral “1” next to that wi-fi icon. That 1 indicates that one device is connected to the camera. I have not attempted to connect to the camera from my iPad at the same time as the iPhone but I presume that, if I did, I’d see a “2” on the back of the camera. [Addendum 7 January 2015: I have now attempted to connect from iPhone and iPad at same time. I didn’t try very hard and perhaps I’m missing something, but after connecting on iPhone, when I try to connect from iPad by selecting the E-M1 network in Settings/Wi-fi, the iOS throws up an alert saying “Unable to connect…” I can’t actually think of a good reason to connect from more than one device simultaneously so this isn’t a big deal to me.]
And you’re now ready to rock and roll.

Using the OI.Share app

So go back to the OI.Share app. You’ll now use the options on the app’s home screen to have your way with the camera. You can click Remote Control, or Import Photos, or Edit Photo, or Add Geotag. These functions are fairly easy to understand. I want to mention only the Remote Control function.
When you click Remote Control, your phone will show you what the camera sees. At this point, things can get a little tricky. If you need to reframe the shot, move the camera. But otherwise, you’re controlling the camera entirely from the phone.
You might notice that the view on the phone seems blurry. Tap on the image to focus at that point. 

Out of focus.
Tap the screen to focus.
At the top of the screen, you can change the camera’s shooting mode. Switch to A (aperture priority) and you can then tap on the aperture setting display and change the aperture. Change to M (manual priority) and you can control everything. You don’t need to touch the camera or change the camera’s mode dial to do this! You really are completely in control from your phone. I think this is pretty cool.
Tap the camera button to take the photo.
After you take a photo, your image will be displayed on the iPhone in “Rec View”. At the bottom of the phone’s display, you’ll see a camera icon (click to return to controlling the camera) or the download/share button. If you click the download/share button, you’ll be asked if you want to Save to Camera Roll. This seems unnecessary to me, because there’s no other option besides cancel. Click “Save to Camera Roll” and wait a second or three while the image moves from the camera to your phone. The app will now advise you that the image has been imported and suggest that you turn off the camera. Don’t do it! It will, in fact, turn off the camera, but if you want to take another photo, you want to leave the camera on. Even if you don’t, turning off the camera from the phone may confuse you later, because it does not move the camera’s on/off hardware switch to off. During my initial confusion about how all this worked, I thought I’d broken my camera. The switch said the camera was on, but it wasn’t responding to me at all. I recommend you click “Close” instead, and return to the camera control screen.
When you’re done shooting, click the iPhone home button to exit the app.

Getting back to normal

I want to say this clearly, because this confused me and it might confuse you. The entire time that you are using the OI.Share app, your camera will continue to display that stupid and unnecessary QR code and the even stupider and more misleading text that it is “Connecting to your smart phone.”

So let me say it again: Once you’ve selected the camera’s network profile from the iPhone Wi-Fi Settings panel and you see the “1” appear on the back of the camera next to the wi-fi icon, you are no longer “connecting”. You are now connected. If I’d written the camera’s firmware, I’d have switched the entire display on the back of the camera at this point to show something else, like an icon of a smartphone and some text saying “Control the camera with the OI.Share app on your phone.” But I didn’t write the firmware, so just be aware that that’s how it works.

When you’ve exited the app on your phone, you can tap the “Stop” button on the back of the camera screen (or click the Menu hardware button) to turn wi-fi off in the camera. From that point on, the camera is once again autonomous.
Finally, if you want to restore the phone’s access to the Internet via wi-fi (say, to upload some photos to your Flickr or Google+ account), go back to Settings / Wi-Fi, and select your home or office or coffee shop wi-fi network.

Next time

Once you’ve got the profile installed on your phone, next time you want to use the phone to control the camera, here’s what you do.
  1. Turn wi-fi on in the camera by clicking the Wi-Fi “button” on the back of the touchscreen.
  2. On the iPhone, go to Settings / Wi-Fi and select the network profile for the camera.
  3. Open the OI.Share app.
All in all, this is a sweet cooperation between camera and phone. 

Talking to young artists about the future of photography

This morning I had the pleasure of talking to a couple dozen art students at Booker T Washington High School for the Performing and Visual Arts in Dallas. Although it’s a part of the Dallas ISD public school system, “BTW HSPVA” (for short) is a rare school: students have to audition for admission. And with only about 900 students total, it’s one of the smallest public high schools in the system. Small, but there’s a lot of talent there!

Anyway, I was there to talk to young art students about photography. It’s an almost absurd challenge, because nearly everything I know about the art and craft and especially the business of photography is rapidly becoming obsolete. Of course, being me, I managed to talk for 45 minutes without difficulty, and while I’m not sure how all the students felt, I would have enjoyed staying for another 45.

I talked a little about how I’d started photography in high school myself and stuck with photography through college and beyond. I talked a little about working in the darkroom. I made the point that, back then, photography that went beyond snapshots simply wasn’t possible for people who didn’t have certain skills: you had to know how to read a light meter to set exposure, how it helped to know what to do in a darkroom, etc. Of course, some of that’s not entirely true. Cartier-Bresson famously had no interest in the darkroom and a lot of professional photographers — I would guess it was the majority of them — handed their film over to someone else for processing. And especially after autofocus and auto exposure became common features of cameras, it was in theory just as possible for an amateur to take a good or even great photo back in, say, the 1980s, with a film camera, as it is today with a digital camera.

But the fact remains that the amateurs did not take over the field of photography in the 1980s or 1990s. I think digital photography was revolutionary because it eliminated — or seemed to eliminate — the risks involved in photography. First, with digital photography, taking photos because basically cost-free, because you didn’t have to pay by the photo for film and processing. Equally important, with digital digital cameras, the risk of taking a bad shot disappeared. Shooting with film, at least if you were a professional and absolutely had to get the shot, well, you had to know what you were doing, so you could shoot with confidence. After all, you weren’t going to find out until later whether your shots were properly exposed and in focus (or well composed, etc). But with digital, you could shoot without thinking, take a look, and shoot again if your first shot stunk. If cameras worked exactly as they do now but didn’t allow you to see your photo instantly on the review screen, I don’t think the world of photography would have changed the way it has.

A handful of the students I was talking to were photographers, and the rest of them were painters, sculptors. One young lady is a printmaker, making linoleum cut prints, something I did in high school and college for years and really enjoyed. I suggested to the photographers that studying a traditional art technique like drawing would help them with their photography. I suggested (more tentatively) that photography might help the other artists, too, by helping think hard about looking and seeing.

But my focus was on the uncertainty of the future of photography as a career. It’s the youngest of the great art forms and the field of photography has been in nearly constant flux for almost 200 years; and it’s now undergoing an upheaval. I don’t know what the future will be. I do know that it will be made by photographers like these young students I spoke to today. It’s not a great time to be in the business of photography, but it is a tremendously exciting time to be taking photographs.

Fotomoto’s back — and Bay Photo’s now in charge

Wow, I stepped out for coffee and while I was gone, I seem to have missed some corporate drama. Lucky me.

What’s a “Fotomoto”?

If you are a photographer using SmugMug, Zenfolio, Photoshelter, Fotomerchant, or similar full-service sites, you might never have heard of Fotomoto because you never needed it. SmugMug, Zenfolio, Photoshelter, et al., partner directly with printing companies. SmugMug uses Bay Photo; Zenfolio uses Mpix; Photoshelter uses several services, one of which (BWC Imaging) is right here in Dallas.

Fotomoto is something very different. It is a print order management service that makes photo-ordering possible on websites that that don’t have their own proprietary print-fulfillment arrangements. Photographers can pick the websites that they like best for their design and other qualities, and get print ordering as an add-on from Fotomoto.

What’s different about Fotomoto is that it doesn’t host photos, exactly. And it doesn’t make prints. It’s a middle man. But it works with a large number of different services, including Viewbook, Pixpa, The Turning Gate, Photoblog, Imagevue, Squarespace, lots of WordPress, Blogger and Tumblr photography sites and many more. If you’re one of those weirdos who coded his own website using html, css, javascript, and php, well, you could use Fotomoto, too.

So what happened?

Well, as is so often the case, the folks who actually know aren’t saying much. But this is how it appears to me: In early 2013, Fotomoto was acquired by a photo-hosting site for pros called Livebooks. Some (all?) of the old staff at Fotomoto, um, ceased to work for Fotomoto any more. Then really ugly stuff happened. Orders weren’t being fulfilled. Fotomoto’s site actually went down for a while. Support requests went unanswered. In short, a service that had been doing a really great job and built a great reputation — viz., Fotomoto — suddenly started doing a terrible job. Seems pretty clear it had something to do with the Livebooks acquisition.

But the story has a happy ending. Bay Photo, which had been fulfilling prints for Fotomoto for a good while, purchased Fotomoto — presumably from Livebooks — in late July 2013. As of the start of August 2013, Fotomoto is once again up and running. Some of Fotomoto’s key staff (like awesome customer support guy Derek) are back at work.

And it all matters to me because I’ve just revived my account at Fotomoto. Let the printing begin — or in my case, begin again!

*
ADDENDUM 8/7/13: Over at PDN I finally found an article that explains more. After acquiring Fotomoto and a couple other smaller companies in early 2013, Livebooks had cash problems. As noted above, things didn’t go well. I mentioned that Fotomoto is now a property of Bay Photo. What I hadn’t known until today is that Livebooks is now owned by Wedding Wire.

EDITORIAL NOTE: Livebooks prefers to write its name “liveBooks”. Cute. I can just barely stand to write “iPhone” and “iPad” but those terms are ubiquitous now and we’re stuck with them. If you write “Iphone” or “I-Phone” people will suspect you just got back from five years in a Tibetan monastery. On the other hand, “liveBooks” to me looks like a mistake. It is not, but I do not feel compelled to conform to their silly branding stylesheet. 

Why I switched from Lightroom to Aperture

Read today an excellent article, “Why I use Aperture instead of Lightroom,” by Mel Ashar; it’s posted at the Aperture Expert blog edited by Joseph Linaschke. Ashar, a landscape and architectural photographer, provides a useful catalog of some of the reasons Aperture is a strong choice for photographers who use Macs. He focuses on the file-management advantages of Aperture that arise from the fact that Apple controls an entire file ecosystem, comprised not just of Aperture, but of iCloud and the file systems on both Macs and iOS devices (iPhone, iPad).

Now, notwithstanding the advantages Ashar enumerates, the consensus seems to be that, Aperture as a photo processing app lags way behind Lightroom. I disagree with the consensus. In fact, shortly after the public beta of Lightroom 5 became available, I started looking again at Aperture and this time I really gave it the old college try. To my surprise, I discovered that I liked it. I liked it a lot. So, instead of upgrading to Lightroom 5, I switched to Aperture 3.4. For the last several months I’ve been using Aperture almost exclusively. I’ve processed several weddings and a bunch of portrait shoots with it.

I want to mention here a few of the things I like about Aperture, perhaps to explain my contrarian decision to switch. My list is meant to add to the advantages already mentioned by Ashar’s article, so if you’re seriously considering Aperture, be sure to read that piece, as well.

Qualifications and disclaimers

(This is the lawyerly part of the article. If you’re impatient you can skip to the next section.)

Let me say up front that I’m not trying to sell you on Aperture. If you don’t use a Mac, it’s not even an option for you. Aperture is aimed at professional photographers who use Macs and shoot a lot of photos—say, pro wedding photographers. For most “normal” users, Aperture is overkill. I should say also that I have no relationship with either Adobe or Apple.

I’m talking about Aperture partly because it’s kind of overlooked these days, probably because, although it was released at about the same time as Lightroom and for a while was even regarded as the superior app (Aperture had soft proofing before Lightroom did), Lightroom has received more frequent upgrades. The big majority of pro photographers I know are Mac users. And most of them use Lightroom (and/or Photoshop).

I want to add that I have a lot of experience with photo-editing apps. Some of this comes from my work as a reviewer for Macworld/IDG, but most of it is simply a result of my interest in getting the most from my photos. I think serious digital photographers should have multiple tools at their disposal, because no one app does everything best, and different apps convert particular images a bit differently. In the past I’ve owned licenses for and worked a good bit with a large variety of apps, including: Photoshop, Bibble Pro, Lightzone, SilkyPix Pro, ACDSee Pro (during my brief apostasy to Windows), Raw Photo Processor, DxO Optics Pro, and of course less powerful apps like iPhoto and Picasa. Currently (mid-2013) I’m using Aperture for eighty to ninety percent of my work, but I am also using Photo Ninja, Snapseed (more on my iPad than on my computer), Acorn (my Photoshop replacement and I love it), and the amazing Nik plug-ins for Aperture, especially Silver Efex Pro and Color Efex Pro.

At a glance, Aperture’s UI looks pretty similar to Lightroom’s (and everybody else’s, for that matter). Aperture’s advantages aren’t really capable of being demonstrated in a screenshot. They’re matters of usability, which means they have to do with how I do things, how easy it is for me to figure out what I should do, and how quickly I can accomplish what I want to do.

A dozen or so things I like about Aperture 3.4

I tried to find a way to organize these points logically, but I gave up. So I’m just going to list them more or less randomly. The executive summary version of what I’m about to say is: After getting to know Aperture pretty well, I have found that:

  • Aperture’s user experience appeals to me more than Lightroom’s did (and I liked Lightroom’s), and
  • I’m even happier with the output I’m getting from Aperture than I was with the output I got from Lightroom. 

Now, details.

1. One of the first things that caused me to look at Aperture again last spring is the realization that Aperture has more and better book creation options. I’m a wedding photographer whose work is all aimed at providing beautiful, high-quality, long-lasting albums for my clients. I created a couple albums for brides in Lightroom using Blurb and they were okay, but not really as nice as the default Apple album you create in Aperture. And Aperture has a number of book publishing plug-ins that allow you to use higher-end publishers like GraphiStudio, Queensbury, and others. I’m finishing a book now right in Aperture using GraphiStudio. I suppose that many Lightroom users use Photoshop for this sort of thing, but I can do everything right in Aperture.

2. Aperture seems a more coherent, better integrated tool. This is undoubtedly a matter of personal taste but I never much liked Lightroom’s seven distinct working modes (Library, Develop, Maps, Books, Web, Print, Slideshow). I never used Map mode, for example, although ironically I have discovered that the Places view in Aperture is so easy that I do use it. I never used the Web or Slideshow modes in Lightroom. I did create a couple of wedding books for brides using the Lightroom 4’s Books mode and the Blurb publishing service, and it worked well enough, although it’s not terribly different from the book-creation process in Aperture and, as I said, Aperture has more and better publishing options. When I first started using Aperture it seemed a bit chaotic, compared to Lightroom’s very compartmentalized user interface. But now that I’ve been working with Aperture almost exclusively for many months, it makes sense to me and I’m impressed at how how everything seems to cohere.

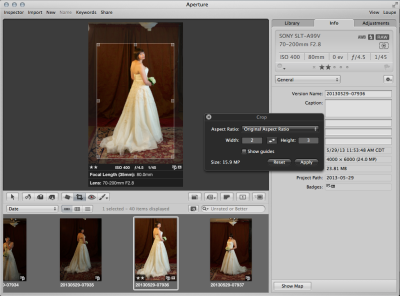
3. I like that Aperture lets me making basic process adjustments and edit data without switching modes. In Lightroom, while I was working in Develop mode on an image, I often had the urge to give it a keyword or a caption or a title. I had to switch to Library/Loupe view to edit metadata, then switch back to Develop to edit. Or conversely, I’d be going through and rating images and simply want to make a quick crop. In Lightroom that would require leaving Library mode/Loupe view to use the crop tool. Then back to Library/Loupe to continue keywording, etc. Much simpler in Aperture. Working Aperture’s Split View with the Info tab visible, I can still tap “c” and make a quick crop. Even a more substantial edit like, say, changing to black and white treatment, simply switches the Inspector tab to Adjustments without altering the way I’m viewing my image.

In Aperture, I can crop an image and make other processing adjustments even in Split View while reviewing images for rating, adding captions, keywords, etc. This requires switching modes in Lightroom.

4. While I’m at it, let me say that, even after half a decade of doing it Lightroom’s way, I never really got used to the way Lightroom’s crop tool works. In Lightroom’s crop mode, you don’t move the crop rectangle, you move the image “behind” it. I’m sorry, but this makes no sense. I mean, the crop tool appears to be placed on top of the image. And the mouse pointer hovers above everything. So why does it make sense to Adobe to reach through crop tool to slide the image around? No other tool works this way. If you want, for example, to fix red-eye, you don’t get a red-eye removal tool in the middle of the screen then move the image around behind it until an eyeball is underneath it. The crop tool itself doesn’t work this way the rest of the time: If you want to adjust the size (coverage) of the crop tool in Lightroom, you grab the corners of the tool and move them in or out, even though in theory you could zoom the image in or out instead. It’s crazy, and I make this adjustment more than almost any other. In Aperture and just about every other program in the world, you move the crop rectangle. As God intended.

Note. Does Photoshop’s crop tool work like Aperture’s? It’s been so long since I last used Photoshop I can’t remember. 

5. Aperture retains deleted files in its own Trash can, so it’s harder to lose a file if you delete it accidentally. Lightroom moves deleted files directly into your Finder’s Trash.

6. Aperture has an actual blur tool. Using negative clarity in Lightroom doesn’t begin to do the same thing. I use the blur brush in Aperture for smoothing out small wrinkles in backdrops.

7. In Lightroom, you have “Clarity.” Aperture distinguishes between Definition and Mid Contrast, which seems to give me a little more control. The Clarity slider in Lightroom is a wonderful tool, but I never really understood exactly what it was doing. And it’s dangerous. Apply too much clarity and your images start to look weird.

8. I prefer Aperture’s options for white balance adjustment based on skin tone, neutral gray or color temperature. Of course, Aperture also provides the standard white balance options based on shooting conditions (daylight, shade, cloudy, tungsten, flourescent, flash) but I don’t use these often and I think it’s smart of Aperture to put them under the Effects menu.

9. It’s nice to have both curves and levels tools. I haven’t fully sorted the levels tool out but it’s clear that it does something different and potentially useful. Because Aperture has a mid contrast slider, I seldom use the curves at all.

10. Aperture’s one-click Retouch tool is amazing. To remove a blemish or some small unwanted part of a photo, especially if there is not a like-sized area nearby that can be used as a model for replacement, Retouch in Aperture is much easier than using the Spot Removal tools (clone or heal) in Lightroom. Of course, Aperture also has clone and heal.

11. I really like that, in Aperture, I can provide location info and a description for a project. This is, I guess, super-meta-data: info about the project that isn’t tied to any specific image file. I only discovered this a short while ago but now I’m adding map coordinates to many of my projects and, when it seems useful, I’m even adding notes about where a wedding took place, etc. No can do in Lightroom.

12. It may seem like heresy or ignorance to say this, but I prefer Aperture’s sharpening tools. I own and have read Fraser and Schewe’s Adobe-centric Real World Image Sharpening. In fact, I’ve read it a couple of times. I don’t like to admit how stupid I am in public but, honestly, the main lesson I got from that book is that digital image sharpening is a really complicated problem. Alas, that didn’t help me much with the mystically interdependent sharpening options in Lightroom (sharpening amount, radius, detail, and masking). The Raw sharpening and Edge Sharpen tools in Aperture are a little less complex, in fact, almost make sense, and in any case, seem to do as good a job as Lightroom’s. And they don’t make me completely switch over to the ugly left (Photoshop) side of my brain.

What I miss about Lightroom

So, those are some of the things that make Aperture 3.4 work better for me than Lightroom 5. Do I miss anything about Lightroom? Yes. Lightroom’s “Watermark” feature is more flexible and easier to use than Aperture’s. I miss Lightroom’s Quick Collection—an easy way to select images from multiple sources. Of the new features in Lightroom 5, the one that I most wish I had in Aperture is perspective correction—although for that, I switch now to Photo Ninja. Lightroom has somewhat better built-in tools for making custom black and white conversions, but that doesn’t matter to me too much personally since I’ve started doing my serious conversions in Nik’s Silver Efex Pro.

But I don’t miss any of those things enough to upgrade to stick with Lightroom. I do hope that Aperture provides us with a version 4 upgrade sometime soon. An Aperture Pro X app that has an iPad version plus a few other improvements would be exciting.

ADDENDUM JANUARY 5, 2014. Notwithstanding the points made above, I’ve reluctantly given in and purchased Lightroom 5. Update here.